School lunches went up to 3 bucks this year. THREE BUCKS! I'm pretty sure that I could drive all the way to town, buy lunch, drive back to school, and still pay less than 3 dollars.
Contributing to this decision is the fact that I lost 10 lbs once school ended. It may only be a coincidence that I ate in the lunchroom everyday, but... It was proof enough for me.
So...I have vowed to not buy any school lunches except for holiday meals. And I might buy a corndog on corndog day. I love corndogs...
Anyway...since I've made this vow I thought it would only be appropriate to make myself a lunch bag. I mean, I've got this new sewing machine. Why not use it?!?
Besides that, I got some real deals in the Hobby Lobby remnant basket a couple of weeks ago. Included in that was cream-colored canvas.
I spent pretty much all day (off and on) yesterday working on it. I didn't have a pattern and I've never made any kind of bag before, so it was a bit tricky until I figured out what I was doing.
I will post a picture when I finish it. It still needs a handle and some kind of closure. If I can figure out the button hole function on my sewing machine, there will be a button. Otherwise I'll just sew some velcro on it.
In any case, it doesn't look much like a lunch bag right now. When it does, I will post a picture :)

Sunday, August 16, 2009


Sunday, August 2, 2009
Party Bow
 I finished this bow today. I am calling this the "Party Bow" because it is just so festive!
This Party Bow was came to life because of a korker ribbon experiment. I hadn't made a korker bow yet, so I dove right in with my 3/8 in grosgrain, some dowel rods, and spray starch. 275 degrees and 30 minutes later, I realized I didn't actually have enough to make an entire bow.
So...I used the ribbon that I had left over from the Hair Bow Holder and made a basic bow. I attached the korker bow to the top. I used a french knotted ribbon as the center, and TA DAH! The Party Bow was born.
I'm thinking once I decide on an outfit for my baby girl's 2nd birthday, I will definitely be making one of these to match.

Saturday, August 1, 2009
A project for next summer!
I have been reading this blog for the last 30 minutes (which, believe me is a feat--I have NO attention span!).
I am afraid I will forget about this project come next summer, so I'll write about it here.
This is perfect for a frugal Mom like myself. I figure I can find some t-shirts at my local kid's consignment sale in the spring to complete this project. Or, like the blog author of Happy Together writes, I can just get them at the dollar store.
I 'm not sure which I love more: the roses on the first dress or the ruffles on the second! I've always wondered how those types of ruffles were done and now I see that it's not that complicated *insert blushing smiley here*.
I'll save this for next year only because I have a lot of projects that are staring me in the face right now. This will be a huge money saver next year!
I am afraid I will forget about this project come next summer, so I'll write about it here.
This is perfect for a frugal Mom like myself. I figure I can find some t-shirts at my local kid's consignment sale in the spring to complete this project. Or, like the blog author of Happy Together writes, I can just get them at the dollar store.
I 'm not sure which I love more: the roses on the first dress or the ruffles on the second! I've always wondered how those types of ruffles were done and now I see that it's not that complicated *insert blushing smiley here*.
I'll save this for next year only because I have a lot of projects that are staring me in the face right now. This will be a huge money saver next year!
Friday, July 31, 2009
Ladybug Bow Holder
My girlfriend's daughter, Ellie, is just 3 months (to the day!) older than my daughter. Ellie's momma is getting  ready to move her into a toddler bed, and thus has decided to redo her room. She is trading in her original nursery decor of Carebears and pink EVERYWHERE and has opted for a ladybug theme.
I made this to give her some motivation for doing the actual redecoration. It was fairly simple to make and I'm very pleased with the results. I also LOVE that the ladybugs at the bottom are kissing (or telling secrets).
I painted the wooden plaque red, with black around the edges and on the back (after some MAJOR sanding...you get what you pay for!). I also did Ellie's name in black, with a small black heart at the end (in case you were wondering). The ribbon is 1 1/2 inch grosgrain (I think...I'll have to check that detail) and I also attached a sawtooth picture hanger on the back for ease in hanging. The kissing ladybugs were the finishing touch!
All in all, it was a perfect gift for Ellie. I also tucked in some hair bows that I made as a bonus :). Never hurts to get in some more practice!
There are more detailed pictures of this project on my Flickr account here.
 ready to move her into a toddler bed, and thus has decided to redo her room. She is trading in her original nursery decor of Carebears and pink EVERYWHERE and has opted for a ladybug theme.
I made this to give her some motivation for doing the actual redecoration. It was fairly simple to make and I'm very pleased with the results. I also LOVE that the ladybugs at the bottom are kissing (or telling secrets).
I painted the wooden plaque red, with black around the edges and on the back (after some MAJOR sanding...you get what you pay for!). I also did Ellie's name in black, with a small black heart at the end (in case you were wondering). The ribbon is 1 1/2 inch grosgrain (I think...I'll have to check that detail) and I also attached a sawtooth picture hanger on the back for ease in hanging. The kissing ladybugs were the finishing touch!
All in all, it was a perfect gift for Ellie. I also tucked in some hair bows that I made as a bonus :). Never hurts to get in some more practice!
There are more detailed pictures of this project on my Flickr account here.
Wednesday, July 29, 2009
Garden glories
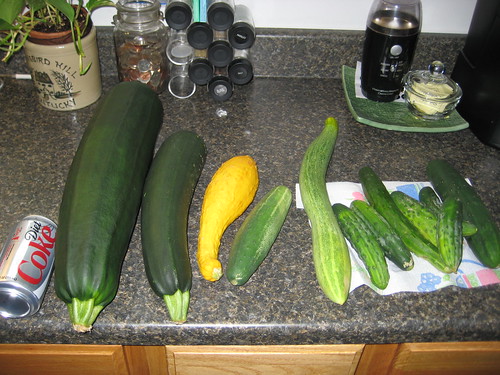 I had debated about including this post in my blog, but decided it was just as worthy as anything else! And since I used my brand new apron to aid in this little project, I suppose it is perfectly appropriate.
We acquired some garden veggies from my mother-in-law, by way of her neighbor. (That's how we do it here in Kentucky. We are blessed, and then pass our blessings on to others!) I nearly hit the floor when I saw the zucchini that she gave us! The pictures really speak for themselves...
 In all, we were given a handful of pickling cucumbers, two zucchini, and one lonely yellow squash. I have plans to use the smaller zucchini and the yellow squash in a pasta dish. My husband loves cucumbers, so those are all his (although I did take three or four to my mom and dad). The only thing I could think to do with that HUGE zucchini is to make zucchini bread.
I used two different recipes, but the one that I will save for next time is Paula Dean's Chocolate Chip Zucchini Bread. In fact, I already have it saved on my computer. (I won't mention the other one because it came from a recipe book I LOVE, but they weren't very good.) After all was said and done, I made one loaf, 24 muffins, and 9 mini loaves using only two-thirds of that zucchini. I took the other third to my mom and dad with some of those cucumbers.
Some notes about the Paula Dean recipe:
1. The recipe is actually what I would call a "double recipe". It makes 2 loaves of bread. Or 24 muffins. Or one loaf and 12 muffins. You get the idea.
2. Since it is what I call a "double recipe", you'll need some large mixing bowls. I don't have very large bowls, so I lost some dry ingredients while I was mixing the dry and wet together.
 3. "In a large bowl, beat eggs until light and fluffy. Add sugar, and continue beating until well blended. " When I got to this part the first time, I used my hand mixer, naturally. The second batch I made, I beat the eggs by hand. I continued beating by hand after I added the sugar. It was just a hunch, and it may have been a coincidence, but I think the second batch was better.
4. Finally, this tip may just be personal preference. On my second batch I only used slightly more than 1/2 cup of chocolate chips, rather than the full cup the recipe calls for. The bread is plenty sweet enough without all the chocolate, in my opinion :).
Hopefully those tips help someone!
Monday, July 27, 2009
The First Project

The first project to come out of The Attic Studio was selfishishly done for myself. I have a habit of expending my creative energies for others, but I wanted
 this one project to be for me. All me.
I had just purchased a new sewing machine to replace the 50's era machine my granny gave me a few years ago. I had no idea that all my frustrations with sewing could be attributed to the sewing machine...I thought it was me!
I headed off to the fabric store, in search of a pattern that didn't seem too daunting. I finally decided on an apron. It came together fairly quickly over the course of a week. I only worked on it about an hour at a time--during my dear toddler's naptime, bedtime, and my husband's weekly trips to the stockyards with his grandfather.
In the end, I'm so proud! I finished sewing something that I love, while only ripping one seam! It is sure to be something I wear often. I'm even thinking about making some more as Christmas gifts for some of the women in my family.
Subscribe to:
Posts (Atom)