Wednesday, December 30, 2009

Wrist Pin Cushion

In my Post Christmas To Do List, I mentioned that I wanted to make a ruffled scarf. My first, second, and third attempts were all FAILS. Miserable. I am putting away the elastic thread for a while until I can look at it without wanting to curse.

Blah. That's how I feel about elastic thread right now.

On to happier news--the wrist pincushion was a huge success. I love it. It's cute. Etc, etc.
(Bring on the pictures!!)


(Don't you love my multipurpose IKEA task light/picture prop? You know you want one.)


I embroidered a little "C" so no one will steal it. (See that tomato pin cushion in the background of the first picture? I'm going to save the strawberry off of it and THROW IT AWAY! That is how much I love this.)


I cut a small square out of a box (incidentally, a ThermaCare box) to put in it so I wouldn't stick myself. I bent the corners just a bit to make it easier to stuff inside. It made the hand-sewing very easy when I stitched the opening closed.

I got this fabric out of the remnant bin at Hobby Lobby (the remnant bin and I have a love-love relationship). It probably cost around $1.50. I have enough left to make my whole family 3 of these apiece. (Not that they would want one. Or need one for that matter...)


Moving on...

I downloaded the Buttercup pattern off the Made By Rae site a few days ago. Here's a sneak peak as to what I'm going to do with that...


Looks like my list might get completed after all! (with exception of the ruffle scarf...which we don't need to talk about.)

Happy Days!

Tuesday, December 29, 2009

Family Journal

I will preface this post by saying that there is no picture. Boring! Sorry... The little one is about to wake up from her nap and I wanted to get this in! There are some fabulous links though!


I vow to be more organized in the upcoming year.

Seriously...I need to work on my openings...

I have come across some of the CUTEST family planners/journals in the last couple of weeks.

I have no interest in keeping an appointment calendar. I would like something I can keep by my bed to record thoughts before bedtime or when I wake up. I love the idea of having a record of my family's year.

Like the diary I had when I was a teenager, only momma-fied. :)

I first discovered this family journal idea here, at Nap Time Journal. Didn't she make the cutest journal ever?? (My google reader loves to see new posts from this blog!)

Ahhh Design has some free downloadable (my spell check says that isn't a word...hmm...) sheets, as well as others you can purchase. Cute!

As soon as I settle on a notebook for my journal and put it together (which should be sometime in 2014...) I will post it!

Monday, December 28, 2009

Yummy Brownie Goodness

Okay, the official name for these are Festive Candy Cane Kiss Centered Brownie Bites (go check out the pics she did. They're yummy). All respect to the author of Picky Palate, but I like to call these "Yummy Brownie Goodness".

A couple of changes I made/will make...I forgot that the melting chocolate needed cream. I started dipping the brownie tops after they cooled, but the chocolate was more like icing (as in, I took a knife and spread it on...). I dipped about 5 of them, got bored, and just drizzled the rest with chocolate.

They were pretty :). I handed them out to some coworkers and they acted like they loved them. I did think they were a little dry. I'm going to try them again and play with the time/temperature. Not anytime soon though. I'm kinda sick of eating sweets (WHAT?!?) and baking due to the onslaught of both during the holiday season.

Sunday, December 27, 2009

Post-Christmas To Do List

I hate a blog post without a picture (BORING), so please enjoy the sweet face of my baby girl as she devoured all the splendor of Christmas morning.

Despite loading my plate for Christmas sewing, I am ready to begin again. My dear, dear husband says I should do some sewing for myself so I SHALL! (Don't you just love him?)

On my list for the next week or so:

1. A ruffle scarf (using elastic thread). I want to make something like this, from Ruffles and Stuff.

2. A wrist pin cushion using a tutorial from The Long Thread. I really wanted (needed) one of these during the apron-making
marathon, but couldn't justify stopping the flow to make one.

3. A purse. I don't know what pattern... Maybe this Buttercup Bag tutorial (free!) from Made By Rae. Heaven knows I have enough stash material to make a few.

I realize this is not a huge list for some, but I have only returned to sewing recently. One of these days, I'll have to tell my story. My "History of Sewing" story. It's not long, but slightly fun (to me anyway...)


Wednesday, December 16, 2009

Christmas Sewing Marathon 2009

How should I start this post?

I've been sooo busy this holiday season! (No, everyone has been busy this holiday season, silly)

I don't know what to say except that I've been busy busy at my sewing machine. And cutting table (a.k.a. the kitchen table). AND the ironing board. A few boxes of ThermaCare self-heating pads later, I was pleased (relieved, ecstatic, etc.) to be finished.

I made these:
One apron each (fully lined, I might add!) for my mom, 2 sisters, 2 nieces, and my daughter (because she loves aprons and would feel left out if I didn't make her one to open with the rest of the girls). I truly enjoyed the monotonous procedures of making so many things of one kind (weird, right?), but I wish I had started them earlier. I gave myself about a month to make all of these. It almost proved to be impossible.


I also made these:


One monogrammed dishtowel for each household in my husband's family. Nine all together. I tied them to the top of a Christmas tin filled with sweets we made together. (Please ignore my sad, hand-me-down table we were wrapping gift on. We have been gifted one from my mother-in-law whenever we find time to pick it out.)

I love making things for other people, especially my family. It never feels like a chore, and it allows me to focus on doing things I love, for the people I love. Win win I believe.

Sunday, November 22, 2009

Unfinished

It seems I'm leaving a lot of things unfinished these days. I'm thinking I will jot down that list here. Maybe I'll even make a checklist for the sidebar.


(Did I just add two more things to my to-do list??)


1. The Owl Dress. Must. Finish. This. Toddlers grow really fast.

2. I sewed a bazillion flowers out of felt to make these (hers are way more involved than mine, but I needed a simpler project). I need to cut the flowers and leaves out and attach them to the stems.

3. A lunch bag. I've made one this year, but the shape makes it awkward. And it looks homemade. AND I snagged some remnant canvas at Hobby Lobby.

4. E's bow holder. I only need to attach the hanger to the back and the ribbon to hang the bows on.

5. I just bought something like 12 yards of fabric to make Christmas presents for family. I should move this up the list...


I'll leave this list as it is for now. Which would mean this list is most likely unfinished... But my work-full-time-but-home-a-week-for-Thanksgiving mommy brain can't think of anything else right now...

Saturday, November 14, 2009

Handing it WAY down

This sweater has been hanging in my closet for years. Probably 3 years to be more precise. I liked it when I bought it (really, I did!), but it seemed so trendy and preppy at the time that I could never bring myself to wear it. So it hung there.

I had an itch to sew the other night, and about 45 minutes to do it in, so I went on a scavenger hunt in the house. I found the sweater and decided to make it into a sleeveless tunic that E could wear over leggings and a long sleeve shirt.

I ripped the stitches that were holding the fake button up collar on, then cut a shape I thought might work (can you tell I didn't really have a plan??). The v-neck and the ribbed bottom stayed the same. All I had to sew were the side seams, armhole seams, and the back of the neck seam.

Easy.

Quick.

Instant gratification.

And besides a bit of altering to the shape (so I can get rid of the bubble butt I gave her when I sewed this), this is totally wearable.

And it freed up some room in my closet :).
Posted by Picasa

Sunday, November 8, 2009

The Cape With 40 Billion Button Holes

I've been working on this cape for what seems like forever.

For. Ev. Er.

I got the fleece as a remnant at Hobby Lobby. I think I paid around $3 for it. I had ordered the ribbon from eBay a while back, unsure what its use would be (it is a zebra print grosgrain).

I made this cape from a pattern (I think is is Simplicity, but don't quote me) last year out of a pink camo fleece remnant from (none other than) Hobby Lobby. It was SUPER cute, but I never finished a closer on it, rendering it nearly useless (we did use it though, because my Mama helped me with it). I was determined to finish this one.

The trouble started when I got my pattern out. I had the back piece, but no front pieces. I also couldn't find the pattern piece to make the pompoms for the hood. In the end, I winged it :). When I put it all together to sew, it magically fit together. BRILLIANT!

Thinking I was over the hump, I sewed it together, did some finishing on the seams (for aesthetic purposes of course), sewed the ribbon on the front, opened up the arm holes (a last minute addition), and got ready to work on the closure.

In the pattern, I believe it called for two ribbons to be sewn on each side. Then you could tie a bow under the neck to close the cape. I didn't like that idea (of course I didn't!!). So I decided on a button and button hole instead.

I practiced that button hole twice before I ever thought about putting that crazy cape under the needle. I practiced with the exact fabric, thread, everything. Both practice button holes were perfect. Perfect.

The real button hole? Well, on the first one the thread jammed. The second one? Thread jammed again. The third one skipped stitches. The fourth one made the thread jam again. I think I tried a couple times after that, but it's all a little blurry.

I finally gave up. I tried to rip out the darn button holes so they wouldn't show....with little success (they were on both sides...). I ended up going back to Hobby Lobby to purchase a frog closure (I think that's what they're called). I tediously sewed that thing in by hand, cursing my sewing machine the entire time.

I think we'll be able to use it next year. Look at that hood--it's huge!!

E loves it, and that's all that matters. She says, "My Mommy made it."

Thursday, November 5, 2009

Happy Birthday Baby


Well, I suppose she's not my baby anymore, now that she's 2... but she still likes to pretend she's a baby, so that's good enough for me!


I worked on this birthday banner for a couple of months, an hour or two at a time. It was a project that I wanted to last for a long time, so I ripped, cut, sewed, ripped again, cut some more, and sewed again before I officially decided on a design.


In the end, it is almost exactly as I pictured. I may go back in the future and add actual fabric paint for the letters (I used fabric markers because of time constraints). I dunno... but I do have an entire year to figure it out!


I used good old quilting cotton from JoAnn's, some cotton twine, Crayola fabric markers, and wooden beads from Hobby Lobby. There were just enough beads of the colors I didn't use for the banner to make a necklace for "the baby" (which I believe, made her day when I gave it to her).


Thursday, October 1, 2009

New Look

The Blog Fairy

I got a new background today, courtesy of The Blog Fairy. She has some great free basic background (which is why I snagged this!). If I'm ever ready to commit to blogging more consistently, I'll do another update on the look. Until then, this is the look!! Lol

I have a very long to-do list hanging in my sewing room. Truthfully I haven't had much time to work on checking things off. I'm almost finished with the owl dress and I'll post pictures when I'm done! I swear :)

Wednesday, September 23, 2009

The Owl Dress

I found this remnant at JoAnn's last time I was there. I rarely even go there because it is so far away (Hobby Lobby is much closer), but I was so excited to find this corduroy covered in sweet little owls. The pinks, greens, and oranges offset the blue and brown in such a cute way that I just couldn't resist.

I finally decided to make E a dress out of this fabric. My first thought was to make a purse/bag for myself, but figured I would tire of the trendy owl pattern too soon to make it worth the work. Toddlers can get away with wearing anything!

The other fabulous thing about this remnant is that the bottom was already hemmed. Less work for me!

This is the very first garment I've ever done without a pattern, so I was extra nervous about that. After reading some fabulous blogs in the last few months, I finally felt confident enough to tackle this project.

I took a dress that E wore this summer (brand rhymes with Barter's ;P) and laid it out on the wrong side of the fabric and traced the front and back, respectively. I'm doing the top of the dress, the pockets, and the straps in a coordinating pink fabric.

This project is even giving me a chance to try out my button hole stitch for the very first time!! I am such a geek.

I'll have to update with a final picture when I finish it. I still need to do the straps, button holes :), buttons, and pockets. E has done multiple fittings for me and she loves it already!

Monday, September 7, 2009

Restyle Fail

I love the concept of restyling old clothes into new ones. It's incredibly eco-friendly, but even better than that--it's budget friendly. Heaven knows budget friendly is exactly what I need right now!

So I set out to try this t-shirt to ruffle cardigan first. How hard could it be? It went pretty smoothly until I tried to attache my ruffles to the cardigan. Here were my problems:

1. I couldn't get my ruffles evenly dispersed. No big deal, I thought, because they're ruffles. And it's a t-shirt. Doesn't have to look perfect. I moved on.

2. Once I got the ruffles attached and did the top stitching, I realized that the ruffles were still...moving around (for lack of a better term). I guess I should have used a stretch stitch.. I dunno.

3. I think the biggest issue was the kind of shirt I used. Too stretchy. Too little (should have just goodwilled it!).

There will be no pictures of this project. I'm adding it to the "do better next time" pile, and will cut the shirt up for cleaning rags. We live and learn!

Sunday, August 16, 2009

Lunch Bag

School lunches went up to 3 bucks this year. THREE BUCKS! I'm pretty sure that I could drive all the way to town, buy lunch, drive back to school, and still pay less than 3 dollars.

Contributing to this decision is the fact that I lost 10 lbs once school ended. It may only be a coincidence that I ate in the lunchroom everyday, but... It was proof enough for me.

So...I have vowed to not buy any school lunches except for holiday meals. And I might buy a corndog on corndog day. I love corndogs...

Anyway...since I've made this vow I thought it would only be appropriate to make myself a lunch bag. I mean, I've got this new sewing machine. Why not use it?!?

Besides that, I got some real deals in the Hobby Lobby remnant basket a couple of weeks ago. Included in that was cream-colored canvas.

I spent pretty much all day (off and on) yesterday working on it. I didn't have a pattern and I've never made any kind of bag before, so it was a bit tricky until I figured out what I was doing.

I will post a picture when I finish it. It still needs a handle and some kind of closure. If I can figure out the button hole function on my sewing machine, there will be a button. Otherwise I'll just sew some velcro on it.

In any case, it doesn't look much like a lunch bag right now. When it does, I will post a picture :)

Sunday, August 2, 2009

Party Bow

I finished this bow today. I am calling this the "Party Bow" because it is just so festive!

This Party Bow was came to life because of a korker ribbon experiment. I hadn't made a korker bow yet, so I dove right in with my 3/8 in grosgrain, some dowel rods, and spray starch. 275 degrees and 30 minutes later, I realized I didn't actually have enough to make an entire bow.

So...I used the ribbon that I had left over from the Hair Bow Holder and made a basic bow. I attached the korker bow to the top. I used a french knotted ribbon as the center, and TA DAH! The Party Bow was born.

I'm thinking once I decide on an outfit for my baby girl's 2nd birthday, I will definitely be making one of these to match.
Posted by Picasa

Saturday, August 1, 2009

A project for next summer!

I have been reading this blog for the last 30 minutes (which, believe me is a feat--I have NO attention span!).

I am afraid I will forget about this project come next summer, so I'll write about it here.

This is perfect for a frugal Mom like myself. I figure I can find some t-shirts at my local kid's consignment sale in the spring to complete this project. Or, like the blog author of Happy Together writes, I can just get them at the dollar store.

I 'm not sure which I love more: the roses on the first dress or the ruffles on the second! I've always wondered how those types of ruffles were done and now I see that it's not that complicated *insert blushing smiley here*.

I'll save this for next year only because I have a lot of projects that are staring me in the face right now. This will be a huge money saver next year!

Friday, July 31, 2009

Ladybug Bow Holder

My girlfriend's daughter, Ellie, is just 3 months (to the day!) older than my daughter. Ellie's momma is getting ready to move her into a toddler bed, and thus has decided to redo her room. She is trading in her original nursery decor of Carebears and pink EVERYWHERE and has opted for a ladybug theme.

I made this to give her some motivation for doing the actual redecoration. It was fairly simple to make and I'm very pleased with the results. I also LOVE that the ladybugs at the bottom are kissing (or telling secrets).

I painted the wooden plaque red, with black around the edges and on the back (after some MAJOR sanding...you get what you pay for!). I also did Ellie's name in black, with a small black heart at the end (in case you were wondering). The ribbon is 1 1/2 inch grosgrain (I think...I'll have to check that detail) and I also attached a sawtooth picture hanger on the back for ease in hanging. The kissing ladybugs were the finishing touch!

All in all, it was a perfect gift for Ellie. I also tucked in some hair bows that I made as a bonus :). Never hurts to get in some more practice!

There are more detailed pictures of this project on my Flickr account here.
Posted by Picasa

Wednesday, July 29, 2009

Garden glories

I had debated about including this post in my blog, but decided it was just as worthy as anything else! And since I used my brand new apron to aid in this little project, I suppose it is perfectly appropriate.

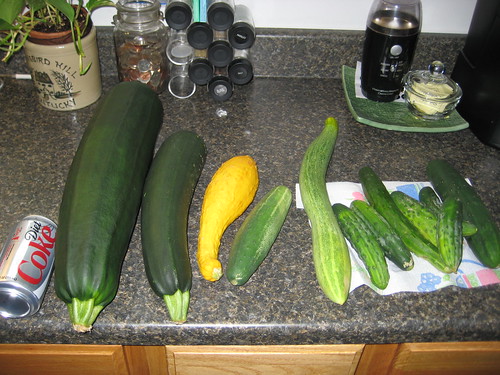
We acquired some garden veggies from my mother-in-law, by way of her neighbor. (That's how we do it here in Kentucky. We are blessed, and then pass our blessings on to others!) I nearly hit the floor when I saw the zucchini that she gave us! The pictures really speak for themselves...


In all, we were given a handful of pickling cucumbers, two zucchini, and one lonely yellow squash. I have plans to use the smaller zucchini and the yellow squash in a pasta dish. My husband loves cucumbers, so those are all his (although I did take three or four to my mom and dad). The only thing I could think to do with that HUGE zucchini is to make zucchini bread.

I used two different recipes, but the one that I will save for next time is Paula Dean's Chocolate Chip Zucchini Bread. In fact, I already have it saved on my computer. (I won't mention the other one because it came from a recipe book I LOVE, but they weren't very good.) After all was said and done, I made one loaf, 24 muffins, and 9 mini loaves using only two-thirds of that zucchini. I took the other third to my mom and dad with some of those cucumbers.

Some notes about the Paula Dean recipe:

1. The recipe is actually what I would call a "double recipe". It makes 2 loaves of bread. Or 24 muffins. Or one loaf and 12 muffins. You get the idea.

2. Since it is what I call a "double recipe", you'll need some large mixing bowls. I don't have very large bowls, so I lost some dry ingredients while I was mixing the dry and wet together.

3. "In a large bowl, beat eggs until light and fluffy. Add sugar, and continue beating until well blended. " When I got to this part the first time, I used my hand mixer, naturally. The second batch I made, I beat the eggs by hand. I continued beating by hand after I added the sugar. It was just a hunch, and it may have been a coincidence, but I think the second batch was better.

4. Finally, this tip may just be personal preference. On my second batch I only used slightly more than 1/2 cup of chocolate chips, rather than the full cup the recipe calls for. The bread is plenty sweet enough without all the chocolate, in my opinion :).

Hopefully those tips help someone!

Monday, July 27, 2009

The First Project


The first project to come out of The Attic Studio was selfishishly done for myself. I have a habit of expending my creative energies for others, but I wanted this one project to be for me. All me.

I had just purchased a new sewing machine to replace the 50's era machine my granny gave me a few years ago. I had no idea that all my frustrations with sewing could be attributed to the sewing machine...I thought it was me!

I headed off to the fabric store, in search of a pattern that didn't seem too daunting. I finally decided on an apron. It came together fairly quickly over the course of a week. I only worked on it about an hour at a time--during my dear toddler's naptime, bedtime, and my husband's weekly trips to the stockyards with his grandfather.

In the end, I'm so proud! I finished sewing something that I love, while only ripping one seam! It is sure to be something I wear often. I'm even thinking about making some more as Christmas gifts for some of the women in my family.


Posted by Picasa